The J-Tone bass control can be set for Boost/Cut or Boost Only operation using the jumper link on the circuit board.
On the board, look for the three-pin header near the middle knob pair. The two-pin jumper is normally fitted from the centre pin to the left pin for Boost/Cut operation.
Move the jumper so it links the centre pin to the right pin to set the bass control to Boost Only.
Disconnect the battery before changing internal settings.
As a rough clock-face guide, the J-Tone bass frequency wheel is around 40Hz at about 9:15.
The treble frequency wheel is around 4kHz at about 2:30.
These are theoretical guide positions only. Component tolerances, pickup response, strings and the instrument itself will all affect the final sound.
(These are differences and don’t describe all the functionality of each unit)
+ J-Retro & Deluxe design focused on the active functions:
* Active totally smooth blend.
* Pickup gain trim for each pickup.
* Pull for BRIGHT on the treble control.
* Sweepable mid control.
* Minimal Get-You-Out-Of-Trouble passive path.
* No passive tone. (J-Retro Deluxe has passive tone)
+ J-Tone design focused on replicating original passive design along with bass and treble Active EQ.
* Vol/Vol/Tone or Vol/Blend/Tone for authentic passive signal.
* Passive tone in active and passive.
* Plug-in tone cap so the passive tone colour can be changed.
* Frequency wheels, one for the bass control, one for treble, allows voicing the bass and treble to the player’s taste.
The starting points we send the units out with are:
TREBLE FREQUENCY: 1.75kHz (set midway between 1.5 & 2kHz) 10:30 in clock terms
BASS HIGH FREQUENCY: 45Hz (set midway between 40 & 50Hz) 10:30 in clock terms
BASS LOW FREQUENCY: 30Hz – 9:00 in clock terms
+ The cap fitted is the deepest amount of tone roll-off.
+ The 3 in the bag have lesser amounts of deepness or darkness.
* The lower the number, the lighter the effect, ie less deep.
+ Once installed, you can perhaps play with things before screwing the plate down.
* Maybe have one screw partially screwed in, but not fully, just to hold the preamp in place while you check things out.
* The default cap fitted to a J-Tone is a 0.1uF (= 100nF) which is the deepest in terms of sound. It was used in the early P basses and is the stock value for East products.
* The 0.047uF (= 47nF) is less deep, often the stock value for Jazz basses, which used to be 0.05uF in the vintage instruments.
* The 0.033uF (= 33nF) is lighter still, very close to the value of 0.03uF, used for the bridge pickup in 62 Jazz basses, which had a tone control for each pickup.
* The 0.022uF (= 22nF) gives the least mellow tone, close to the vintage value of 0.02uF. This value does not seem to have been used in Fender basses, but a number of bass players like to use this cap for passive tones.
The J-Retro focuses on active functionality. It features a smooth active blend, pickup gain trim for each pickup, a bright switch on the treble control, and a sweepable mid control. The passive signal path is minimal and lacks a passive tone control (except for the J-Retro Deluxe).
The J-Tone emphasizes replicating the original passive design while adding bass and treble active EQ. It offers Vol/Vol/Tone or Vol/Blend/Tone configurations for an authentic passive signal. The passive tone control functions in both active and passive modes. It also includes a plug-in tone cap for adjustable passive tone color and frequency wheels for customizing the bass and treble voicing.
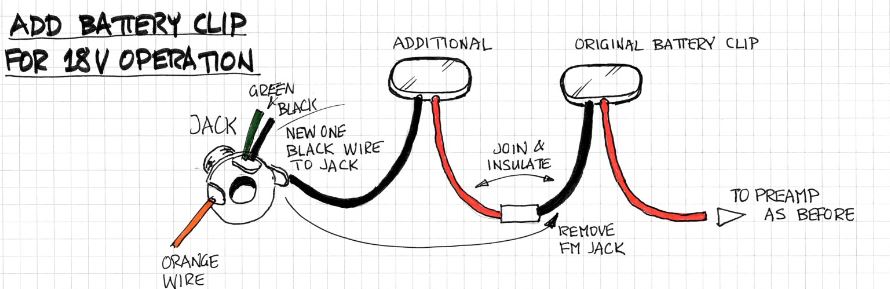
All our products, although supplied with a single 9V battery clip, are designed to work 9V or 18V out of the box. Just add the additional battery, or connect to an 18V battery box, no other changes are necessary.
Either add another battery snap, as below pic.
Or snip the single snap and connect to an 18V battery box, Red to Red, Black to Black.
Battery life depends on the battery type, quality, and spec. There’s not a one size fits all answer.
The J-Tone requires just over 2mA of current. So a battery with a capacity rating of 500mA should last ~250 hours.
If battery voltage is measured, that should always be done whilst under load, especially if a battery has had some use. Once battery voltage reads below 6V under load, it should be replaced.
Distortion will set in according to the battery voltage and signal level coming through the preamp.
So it’s hard to specify the exact voltage where distortion will set in. It depends on the output of the pickup(s), how high the volume is set, and how much low-end EQ you have dialled in.
If you had low output pickups, the voltage could go lower before distortion set in, for example.
The chips are spec’d to work down to 6V, but they will often work to a much lower voltage. See below about measuring the battery voltage.
DON’T DO THIS: Don’t disconnect and take the battery out of an instrument to measure the battery. It will often be a false reading if the battery has been used to any extent.
IMPORTANT – Measuring The Battery with an East Preamp:
The battery should be connected to the preamp with a jack inserted into the instrument so that the preamp is turned on. In other words, the preamp is loading the battery.
Then probe each terminal with your meter while the battery is powering the preamp.
(The reason for having the battery connected, is that a weak battery can still show what appears to be a decent voltage without the preamp)
Join WaitlistWe will inform you when the product is available. Please leave your valid email address below.